
 I should have posted this on my blog earlier. About a year ago I decided to rig up a draft setup in my 1988 VW Vanagon Westfalia van. Details can be found at http://www.thesamba.com/vw/forum/viewtopic.php?t=566037&postdays=0&postorder=asc&start=28.
Sep 27
Draft Beer in the Westy
Permanent link to this article: http://www.slobrewer.com/homebrewing/draft_beer_in_the_westy/
Oct 03
Updated Mobile Calculators
I’ve been using Twitter’s Bootstrap UI framework on a project at work and thought I’d make use of that knowledge to bring the handful of web based brewing calculators I wrote up to modern times. Check out www.slobrewer.com/mobile/ on your computer, iPad, or phone and see what I mean. Also, feel free to let me know if there are any quick additional calculators you’d be interested in me writing.
Dave.
Permanent link to this article: http://www.slobrewer.com/uncategorized/watch-kong-skull-island-2017-full-movie-online-streaming-online-and-download/
Jul 22
Fermbot
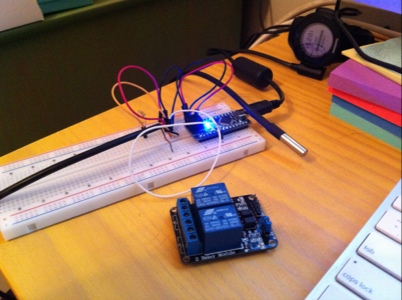
Keep an eye on this space as I’ll soon be sharing some of the details of an Arduino based dual-stage multi-step fermentation controller project I’m working on. My goal is to make something brewers can put together for under $100 without skimping on functionality.
Dave
Permanent link to this article: http://www.slobrewer.com/homebrewing/gadgets/fermbot/
May 25
Camping With Homebrew
 I’m sure many of you are like me and share a passion for both homebrew and camping. The challenge, of course, is how to easily bring homebrew along with you when you’re in the great outdoors. I have experimented with a range of options from bottles to traditional glass growlers in coolers all the way up to portable keg serving setups. I’ll cover the keg options at a later time but right now I want to focus on what has been extremely easy and reliable for me recently.
Last year Hydroflask released a 64 ounce double walled stainless growler:

I got one right away and have been using it consistently for the last year and a half. Overall I’ll say that while it’s not a cheap product I think it is well worth the money.
Right off the bat you’ll notice that your beer foams very little as you fill from your taps. I have pretty well balanced draft lines so get little foam anyway but compared to glass growlers I notice this one has consistently much less foaming. My guess is that it’s a combination of the stainless steel having little thermal mass and being polished extremely smooth so there are no nucleation sites. In practice this means that I’m able to fill a growler right from the tap without having to use tubes, jockey down the pressure, or wait for the foam to subside. I typically take around a minute to get a full 64 ounces. The silicone o-ring sealed screw cap holds pressure well and is very easy to close.
So how does it do in terms of keeping the beer cold? I’m sure you won’t believe me but I’ll say I’ve had numerous occasions where I had beer for 24+ hours in the growler without any kind of cooling and was able to pour it at near kegerator temperatures. It’s good enough that on two separate Joshua Tree trips to the desert I haven’t even bothered putting the beer in a cooler. Heading down to the homebrew shop or a club meeting is of course no challenge.
Is there anything I’d change about this growler? Honestly the only thing is that it’s a bit pricey. I’d love it if it was closer to $25 but I certainly don’t regret paying full price. If mine were lost or stolen I’d replace it in a heartbeat. I’m also thinking of getting a second so I can easily have a full gallon of beer with me.
The second half of the problem with taking homebrew camping is that you don’t have your favorite glasses to drink from. I tried and compared two different options that attempt to fill this gap. The Silipint is a silicone drinking vessel in the shape of a traditional pint. The benefits are that it is indestructible, relatively light weight, and moderately insulated. On a cold night it’s nice to have your beer in a Silipint and not have to freeze your fingers. I was worried about getting an off flavor or an odor from the silicone but after the first couple of washings it’s totally inert. I have noticed that the silicone surface results in a lot of off gassing and a foamy pint.
The second choice, and my strong preference, is a new offering from Kleen Kanteen: the Stainless Steel Pint. These light weight stainless steel pints are extremely durable. While you might think you’d get a metallic flavor from the pint in fact it’s totally neutral. In fact when compared side by side my homebrew tastes better from these than the Silipints. I think the reason is that they are inert and pretty much get out of the way. Their only downside is that on a cold night they can get your hand pretty cold. They do help block any sunlight from skunking your beer, which is a plus.
If I were to buy again or recommend a solution to friends I’d go with the Kleen Kanteen Stainless Steel Pint. They are a solid choice at a good price and the beer tastes great. Overall when you pair them with the Hydro Flask Insulated Stainless Steel Growler you can’t go wrong. This is my go-to setup whether I’m heading to the beach, camping in the desert, or simply taking beer to share with friends.
Permanent link to this article: http://www.slobrewer.com/equipment/camping-with-homebrew/
Mar 30
Search for the Ideal Mash Tun
I got a note from a visitor to the site who was curious about how my process has evolved:
One of your earlier blogs said you moved from your Blichmann 10 gallon mash tun to a simple Gott cooler and found the going easier.
What are you using these days and how would you describe the difference between the two?
– Cory
Well, Cory, this is something I’ve gone back and forth on a few times. I will say that if you do single infusion mashes for 5-6 gallon batches then the Gott or Igloo cooler is a nearly ideal tun. It has low thermal mass, holds temperature extremely well, is cheap and durable, and cleans up and packs away easily. When I was batch or fly sparging this was my go-to vessel especially because I brew outside in the evenings and there can be a chilly breeze.
Well there is one major downside of the cooler that made me switch to a 15 gallon Blichmann mash tun for my 5 gallon batches. I have switched to doing almost entirely no-sparge brewing (see my article in the November 2011 BYO Magazine) and a Gott cooler is really only good to about 1.040 gravity for six gallon batches. Due to the way that the ratio of wort trapped in the grain versus runoff works even a few more gallons in capacity makes a huge difference. A 15 gallon vessel is good up to around 1.080 gravity six gallon batches. I tried other coolers but could never find anything that matched the perfect layout of the Gott so I bought a 15 gallon Blichmann Boilermaker.
This left me with the problem that caused me to leave the Blichmann mash tun in the first place: temperature drops. Well since I started doing no-sparge brewing I ended up with significantly more thermal mass in the mash tun. All the liquor goes in up front so everything is more stable. I use a pump to constantly recirculate the wort during the mash but use direct fire on the mash tun itself to bump the temperature when needed. I typically mash in at the desired temp and then check and direct-fire at 5 minutes, 10 minutes, 20 minutes, 30 minutes, and 45 minutes in the mash. At a few of those points I stir a bit as well. The burner is set very low so combined with the recirculation there is little risk of scorching. Many of those times I’m just a degree or two low. At the end of the mash I just redirect the pump to the boil kettle and I’m good to go.
I’ve also found that the stirring that goes along with this routine results in a more consistent efficiency, probably because the enzymes and starches are mixed up more evenly. And of course I love the great features on the Blichmann including the laser etched sight gauge for the liquid level, the nice ball valve, the excellent false bottom, and the ease of cleaning stainless. I really couldn’t be happier.
Well if all of this sounds like too much work (it isn’t really) then keep your eye out for a new toy from John Blichmann that will help with dialing in a consistent temp. His new Tower of Power will recirculate the mash and kick on the burners when needed. I’ll have a review of this on my site shortly after it’s released to the market as I won the first production unit in a raffle at NHC in San Diego. He’s been delayed for a while in dealing with sourcing some of the more challenging electronics from overseas suppliers so I don’t have an ETA.
I hope that helps, Cory.
– Dave.
Permanent link to this article: http://www.slobrewer.com/homebrewing/search-for-the-ideal-mash-tun/
Recent Comments