Brewing Tricks: Swirl Your Bottles

It’s competition brewing season so I have gotten back into bottling beers instead of just kegging them. I also just made 10 gallons of single-decocted Bavarian Hefeweizen and put about half of it in flip top bottles to be a bit more traditional according to Stan Hieronymous’ Brewing With Wheat. One issue that always annoyed me was draining StarSan from bottles. It took a while to get the liquid out of the bottles and then I had to wait for the bubbles to subside or deal with foam coming out of the bottle.

Well recently I got the MoreBeer Counterflow Filler and watched the video by John Plise. In it he briefly mentioned a tip that I’d missed on previous viewings. When draining bottles rather than letting them glug and bubble straight out you can give them a quick swirl. A simple motion sets the sanitizer into a vortex in the bottle allowing air to come up the middle as the the liquid drains down the sides. The result is a much faster drain and significantly decreased bubbles in the bottle. All of this means that I can give up the bottle tree and just use a bucket with about three gallons of sanitizer during bottling. I invert the bottle, give it a swirl to set the vortex, and then wait a few seconds for the liquid to drain out.

Permanent link to this article: http://www.slobrewer.com/homebrewing/brewing-tricks-swirl-your-bottles/

Blichmann QuickConnector Stainless Steel Fittings

Over the years I’ve had a fleeting love affair with the idea of switching my homebrew setup to use all tri-clover fittings.  The theory is that doing so would ensure that there was not place for beer spoiling organisms to take hold on the cold side and ruin my beer.  Each time I dove in to plan out the changes I ran into two major problems.  The first was the obvious problem that switching over all my fittings would cost a princely sum.  Each hose would require two barbed tri-clover ends and each vessel or pump would need some as well.  My rough cost always penciled out to $250.

The less obvious issue was that since many of my components were threaded already (e.g. the March pump and ball valves on the Blichmann Boilermaker) then switching to a tri-clover fitting had minimal benefit.  The threads themselves potentially harbor the wort spoilers.  Threading a tri-clover fitting onto the existing components didn’t really improve the situation other than just looking cool.

So for a long time I simply used brass hydraulic hose quick disconnects (email me if you want more details.)  Well I ultimately decided to get rid of the brass but still stick with fittings that took minimal effort to connect and disconnect.  My first attempt was the original Blichmann quick disconnect fittings.  They did just fine but got too hot to touch when recirculating the mash or boiling wort.  Well John Blichmann once again read my mind when he improved his quick disconnect fittings.

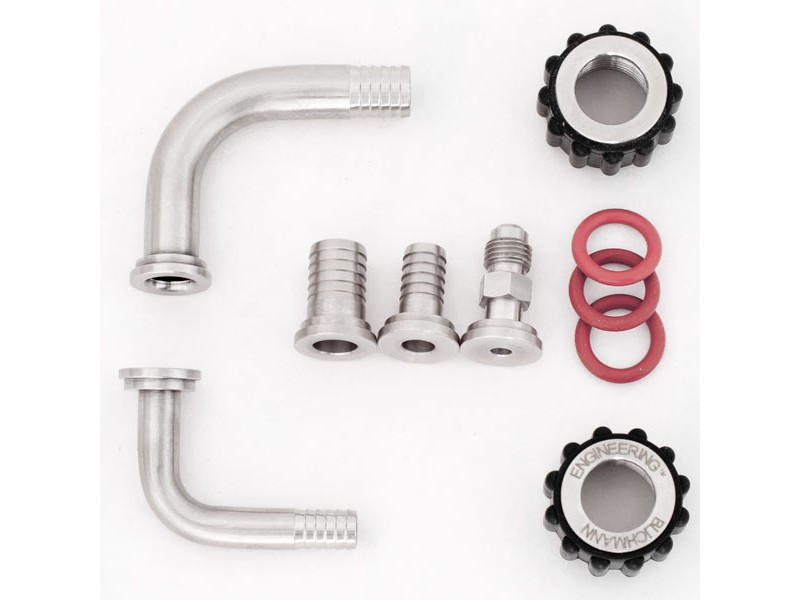
Recently Blichmann Engineering started offering the Blichmann QuickConnector Stainless Steel Fittings.  Basically they are silicone coated nut over various tail pieces to meet your needs:

Blichmann QuickConnector Stainless Steel Fittings

I swapped out all my brass quick disconnects to these because I have more confidence that heat will sanitize the tailpiece and silicone O-ring assembly compared to the brass quick disconnect.  Additionally the silicone ensures that I’m able to quickly switch my hoses without burning my fingers.

Compared to the previous quick disconnectors the obvious benefit is the silicone that makes it more comfortable to use with bare hands.  The less obvious change is that the silicone O-ring stays with the nut and tailpiece fitting much more solidly.  Previously I had to watch out for the O-ring falling out and had to store them separately.  Overall the new QuickConnector fittings are winners.

Getting back to the tri-clover fittings, given that I have to have threaded connectors on the cold side of my brew setup anyway the tri-clovers simply aren’t worth it.  If I were building a nano-brewery I’d weld in threadless fittings on each vessel and on the pumps but that’s not an option.  As a result the Blichmann connectors are the right balance of features for homebrewing.  My only reservation is that when you include the tailpieces they retail for around $15 a piece, which seems too steep to me.  I went ahead and plonked down the cash but honestly think that the right price point is closer to $10 for a pair.  Hopefully John will get to this point as he increases the scale of manufacturing.


Permanent link to this article: http://www.slobrewer.com/equipment/blichmann-quickconnector-stainless-steel-fittings/

Moving to Amazon EC2

As some of you who follow happenings in the tech world know, GoDaddy has been doing some less than great things these days.  A CEO who hunts elephants, advertising that demeans women, and a customer service team that is entirely driven to sell more has pushed me over the edge.  I’m moving over to a new server hosted on Amazon EC2.

All of this shouldn’t mean much to you as the site should continue to be stable and work smoothly.  Let me know if you find any broken links or otherwise run into any problems.

Dave.

Permanent link to this article: http://www.slobrewer.com/announcements/moving-to-amazon-ec2/

Backing Out the Therminator

Sometimes process changes aren’t for the better. This fall I made a bunch, starting with the Blichmann Hop Blocker. Then came competition brewing season and I didn’t have time to evaluate the results due to my frantic schedule (1-2 batches a week for three solid months.) The good news, though, is that I’ve now got lots of data both from the NHC feedback and my own testing and I’m going to make some changes.

The verdict? Not good. Several batches suffered from mild wild yeast infections. The judges didn’t always pick up the cause but when you taste them side by side it’s easy to pick up the problem. The other batches seemed to be lacking something that I couldn’t put my finger on. Not one batch was better than what I used to make before.

So, what did I change and what am I backing out? First, I started using the Blichmann Hop Blocker. It’s a great product that really helped prevent trub from reaching the fermenter. The problem, though, was that in the 10 gallon Blichmann Boilermaker my copper immersion chiller no longer fit. So I decided to change over to a Blichmann Therminator. Of course that meant a different setup for whirlpooling and sanitizing at the end of the boil.

Long story short, I tried several methods but ultimately about a quarter of my batches ended up infected in some way or another. The ones that weren’t infected seemed duller. I’m not 100% positive of the mechanism at work but suspect it has to do with letting the wort whirlpool and sit hot at the end of the boil. Why’d I do that? Otherwise the trub in solution at the end of the boil and hop pellet material would clog the Therminator. Ugh, what a mess.

Here were the downsides I found with my use of the Therminator:

  • Infections – despite back-flushing with hot PBW at the end of the brew day, circulating boiling water to sanitize before use, and attempts at autoclaving (which simply took too much effort to do regularly). I hadn’t had a problem with this before and the Therminator was the biggest change I’d made.
  • Added time – all the time I was spending trying to clean and sanitize the Therminator ultimately made my brew sessions longer.
  • Stuck Transfers – on two different hoppy batches I managed to clog up the Therminator completely meaning I couldn’t get all my wort into the fermenter.
  • Leaving the wort hot for longer – compared to an immersion chiller, which started dropping the temp of the whole batch right away, using the Therminator leaves wort at near boiling temp for longer. The Therminator was nice and fast but I had to do a hot whirlpool and let it settle for a total of about ten minutes before I could even start the draining.

Don’t get me wrong. I’m sure some folks are making great beer with this gadget but I’ve given up.

So I’m going back to an immersion chiller with a whirlpool. I’ll be brewing this weekend with this change in place and will post my results. The lesson here for me is to really take a more critical look at any changes I make to see if they’re really an improvement to the end product, the beer in the glass. And I need to do that well before competition brewing season. This year I’m going to use the summer for experimentation with process and I’m going to lock down all changes by October so I have time to let everything shake out before the winter brewing rush.

Happy brewing,
Dave.


Permanent link to this article: http://www.slobrewer.com/equipment/backing-out-the-therminator/

In Defense of An Analysis of Brewing Techniques

So after using An Analysis of Brewing Techniques to help answer a question that one of my homebrew club members had about fining, I decided to check Amazon to see what kind of reviews the book has received. To my shock I found a pair of low ratings from a decade ago that seem totally out of place. How could such a great book that’s cited numerous times in other homebrew texts and the BJCP study materials have a 2 1/2 star rating?

I’ve posted a review here: An Analysis of Brewing Techniques Review. If you don’t have this book see if you can track down a copy. If you do have this book I encourage you to post a review on Amazon to balance out the ones from so long ago. I’d love to see Brewer’s Publications revive this book for a new edition if possible.

Oh yeah, and sorry for not posting for a while ;). It’s been a busy year. Though just recently I had my Ordinary Bitter and Kölsch place in the first round of the NHC so they’ll be moving on to the big show. Both were recipes from Brewing Classic Styles: 80 Winning Recipes Anyone Can Brew with tweaks to match my process and with built water.

Happy brewing!

Dave.

Permanent link to this article: http://www.slobrewer.com/homebrewing/in-defense-of-an-analysis-of-brewing-techniques/